Showing posts with label nail polish. Show all posts

Sunday, October 5, 2014

Day 69: Sally Hansen complete salon manicure nail polish nail art stamping

Todays post is a simple view on my nails of the day. I'm really into warms and browns and nudes right now, hence the manicures.

Enjoy the slideshow


I specifically wanted to blog these nails because of the stamping. I recently received a new stamper aka marshmallow squishy stamper in the nail polish world. 
Below is the picture


This stamper has changed IT ALL FOR ME. Seriously. You may have heard people religiously loving this stamper by that brand or hating stamping all together. I used to be one of those people who loathed stamping cause i knew it wasnt going to come out right.

Then i bought this squishy stamper, which was recommended by my friend Charity.
She IS THE BEST STAMPER EVER!! So i took her advice and bought it. Truth be told, i love this stamper, and i acutally look forward to stamping now. I think to myself, "what stamping plate do i want to use" while smiling all the way. I'm no longer hesitant, scared or just turned off by stamping. Its exciting now. A new avenue of the nail polish world has opened up for me.

YOU MUST GET ONE, IF ITS THE LAST NAIL SUPPLY ITEM YOU EVER GET! 
Want the link? 
let me know and i shall provide it.


Monday, August 4, 2014

Day 60: My nails of the day - Rimmel london blue - wet n wild- megalast

Hi everyone! Todays post is a very simple slideshow of my latest manicure.

I love the color combo of dark blues with the milky cream white polish and decided to share it with you all.


Enjoy!

The Creamy off white color is: Wet n' Wild megalast in: 2% milk. Pretty fitting name for it, right? :)
 The BLUE IS: Rimmel London Salon Pro in: Barmy Blue. I bought it at Cvs for $3 bucks i think. The formula for this color was a little streaky and thinner than the mango colored one i tried from this line. After 2 coats, the streaky look was gone.
 Just a few simple dots and color combos.....will be adding embellishments later :)

 And yes, i did indeed change my nail shape. I was getting tired of squares and wanted something different. What do you think? PLEASE LET ME KNOW in the comments below

The 2 colors I used. :) 


Until next time,
"Have a grand day and dont forget to Glaze!"

Wednesday, June 4, 2014

Day 52: DIY Nail Swatch cards - painters swatches

Hello darlings! I promised to make a blog post on nail polish swatching tips, if you responded to my original pic via instagram. You all graciously responded, and many thanks for that. Here is the awaited HOW-TO on nail polish swatching and organization.

I wont waste any time, im gonna jump right into it. :)

STEP ONE: one 3X5 note card
 STEP TWO: Fold in thirds and cut or tear in equal pieces
 TURN CARD OVER
YOU will need nail polishes you want to swatch, by color, brand, etc, whatever way you prefer swatching your collection. I PREFER by color because its just makes it even more organized and if i need a pink, for example, i can go to my swatch cards in the PINK section and find all the pinks i own. I would think swatching them by brand would not be as organized or efficient but its your choice lovelies. MOST IMPORTANT: you have to like the swatch cards, to use them, so do what FLOATS  your boat :)~

STEP FOUR: APPLY 1-2 good coats evenly across the note card. Most people use 2-3 coats of polish on each nail to get that perfect color their after. With swatching, if you use ONE thick coat of polish and swipe across gently, it should give you that 2 coat on the nails look. 

CAUTION:  swiping too many coats of nail polish on the notecard will result in color inaccuracy because it would be like applying 5 OR MORE coats of polish on your nails. Do you understand what i mean? IF NOT, COMMENT AND I WILL CLARIFY. :) 
 STEP FIVE: Let your lovely swatch dry completely. Once you get the hang of it, you can swatch 4-5 polishes on ONE card, leaving the right amount of space between each swatch to label THE polish.
STEP SIX: LABEL, LABEL, LABEL! 

AND Voila, you can now make TONS of nail polish swatch cards and keep organized. 

BELOW is how i store my nail polish swatch cards. AKA Painters cards :) :) 

 Bought this little photo book at a thrift store for 99 CENTS! This is not an expensive DIY :)
 The clear plastic is perfect to PROTECT your nail polish swatch cards. I would HIGHLY RECOMMEND a photo book like this, that opens long ways and the sleeve opens at the top NOT the side. I tried the tradition 4X6 photo book but, oh what a pain to organize little swatch cards and move them around in the plastic to get them just right.  :/ 
 This is how my cards look, all wonderfully colored with my reds and ORGANIZED. Thats the whole point of a DIY, to help your life and STAY organized. PLEASE let me know in the comments below if this helped your life, even if just a little.

I have been there, done that with nail polish sticks, wheels, nails, stickies, THE WHOLE NINE. This has to be, by far, the EASIEST, NICEST, and MOST EFFECTIVE way i have found to organize a LARGE nail polish collection.


Until next time,
"Have a grand day and dont forget to Glaze!"

Wednesday, May 28, 2014

HUGE GIVEAWAY COMING YOUR WAY


So my fellow nail lovers and blog readers, I am hosting an amazing giveaway starting June 6th. 
This giveaway is going to be EPIC!!! Whether you're into nails, makeup, pampering, girly things, etc. you can be sure there is something for everyone.

I need your honest opinion though. Would you prefer ONE GRAND PRIZE WINNER
or 3 WINNERS?

Please comment and let me know

Saturday, May 17, 2014

Day 49: DIY Crayola Watercolor Nail art

Hello lovelies,
Today is a different kind of post. I have been dabbling in creativity and using different mediums in hopes to create different kinds of nail art and techniques. I saw somewhere on pinterest that a lady used her kids watercolor paints to create nail art. So you know i had to try this too. ;)~

I began hunting for the cheapest water color paint set i could find, while sticking to the Crayola brand, as i have loved that brand since a child. Nothing worked better than Crayola for me. Not Roseart, store brand, etc. I was an absolute Crayola fanatic as a child. Thinking back, i have always loved art and creating things. Any who, i remember having the big, almost briefcase looking, crayon holder. Anyone else have one of those as a kid? PLEASE do share if you have. This briefcase contraption looked very much like the one (i found via google) below.

So now as an adult, i traveled store to store in hopes to find Crayola water color paints. I ended up finding one for less than $2 bucks and then the following week, found another one for $1.49 while on a grocery run. Both i brought home with me.  :) :)

TECHNIQUES:
I have never worked with watercolor paints on the nails so i didnt have a technique to go off. SORRY folks. It was a trial and error kind of thing.


 The above picture is the watercolor paints and the different dots i played around with

FROM LEFT TO RIGHT:
Nail #1 was me using a dotting tool and dipping it in water color paints then dotting on the nail
Nail #2 was me using a cutip and lightly dabbing at the wet dots to soak up some colors (in attempts to try the bubble effect i see alot on instagram.....don't think it worked quite well. What do you think?)
Nail #3 After letting the water color dots dry for a few minutes, I again used the cutip and dabbed more of the watercolor off, to create a washout effect (kinda like this one alot....why? idk)

EACH nail was painted 2 coats of white polish and let to dry BEFORE attempting water color on them. This is a MUST unless you want a big smeary mess.

The picture above is some of my favorite designs using the Crayola water color paints. 

So, what do you guys think?Are you tempted to try watercolor nail art too?
Do you hate it?

Lemme know PLEASE :) :) 

Until next time,

"Have a grand day and dont forget to Glaze!"

Monday, May 5, 2014

Day 47: Ceram Wrap DIY nail art - pastel colors


I hope you enjoy todays manicure, inspired by spring and the brightness of flowers and sunshine.

Heres another view of this fun manicure below

As always my darlings,
"have a grand day and dont forget to Glaze!"

Saturday, February 1, 2014

Day 40: Nail Mail indie polish maker

Hi everyone! Today is a very special post
 To showcase a very special cause: SUPPORT FOR SMALL BUSINESS and indie product makers.

The Story:

As I was coming home from an aromatherapy essential oil class, I received some nail mail. All you polish lovers know how wonderful it is too receive nail mail and seeing mine instantly put a smile on my face. :) 

So I open the mail and I receive, not only beautiful indie polishes but a thoughtful, personal note from the creator herself.

View the pic below to see what the note said.

This is why folks, it's IMPORTANT to support local and small businesses. It does the AMERICAN community no good to give our 💵💵 to rich people who are getting richer and outsourcing jobs. The ECONOMY we live in needs the help of local, USA invested and handmade businesses to uplift us out of this slump.


THINK BEFORE YOU BUY.
Ask yourself: "If I buy this, will it help put food on the table for a family here on our US SOIL?

If it won't, perhaps saving a few extra bucks and investing In local products is the BETTER INVESTMENT.


As always, have a Grand day and don't forget to Glaze!


Sunday, January 26, 2014

Day 39: Birthday Nails from Moi

Hello everyone,

Here is a very special post because its my BIRTHDAY!!! January 25th to be exact, I officially turned 26 years old.... Closer to 30 years old every day :/

Here is a pic of me and the most special person in my entire life, My Husband Adam and I.


 My special birthday cupcake nails!!! 

I created this look using:
1. Indie polish by Everybeauty Nail Lacquer
2. Konad cupcakes on stamping plate BM14
3. Dotting tools that i bought from Ebay
4. Nail Art Deco striping polishes from Dollar tree
5. and a variety of colors and wackiness, all my own :)

I hope you all enjoy. 

As always,.
Have a grand day and dont forget to GlaZe!

Monday, December 23, 2013

Day 28: Maybelline Color Show Sequins Nail polish

HEllo everyone! If you are new to my blog, WELCOME. For all the regulars, today is a post on glitter polishes. I wanted to share with you the great deal I found at Big Lots. The Maybelline Color Show Sequin polishes were only $1 EACH! How could I pass up this amazing deal right?!? That was how I reasoned myself to buy them. Truth be told, i have 2 polish racks that fit 90-100 polishes each and both are COMPLETELY FULL! I told myself, "Melanie once both polish racks are full, NO MORE polishes for you." Well dear readers, I have dishonored my declaration, because I now have more polishes than I do rack space... :/ My next step is to sell those polishes that I am not too fond of so ALL my polishes can fit on both racks. 

From the beginning of this polish journey, to now, I told myself ORGANIZATION is key to maintaining this nail polish relationship. I have 2 polish racks, a drawer that hold my nail supplies, and a desk that i can work on while painting my nails. I am going to stick to this layout. The last thing I want, or MY HUSBAND wants, is polishes everywhere all over the house. UGH! No way. Love blogging because I can share these random blabberings with you all and you actually "listen" to me. GuSH :) Thank you for reading this. I shall get off my soapbox now. 

Below is a picture of 3 glitzy polishes by the Maybelline Color Show collection.
If you would like some swatches, be sure to comment and I shall honor your request.


Have a Grand day and dont forget to GlaZe!

Saturday, December 21, 2013

Day 27: Frosted Snow Globe Nail Design - Nail art

Hi all!!! Hope you are enjoying the wonderfully cold weather and playing in the snow, snow, snow!!! It doesn't matter your age, snow is just fun and to play in it feeds the inner child. I have yet to master the art of a perfect snow man but a girls gotta try. NEVER GIVE UP is my motto so how could I abandon the adventures of finding the right snow, the best sticks, and going to town on making a snowman worth photographing. Well dear reader, I have yet to master the perfect snow man outside, but i believe i managed to come close in this winter inspired manicure.

Let me know what you think please!!!! 


Want to know what polishes I used? Want a pictorial? Drop me some comments below please and I shall honor your request.


As always,
Have a Grand day and don't forget to GlaZe!

Tuesday, December 17, 2013

Day 26: Sally Hansen Gem Crush Nail Polish Swatch

Hello Nail Polish lovers and all my glitzy fans out there! You will surely enjoy today's Nail swatch featuring the lovely Sally Hansen: Gem Crush Series Polish. You can find Sally Hansen nail polish in almost any local drugstore, chain store etc. I have seen these polishes at my local CVS for up to $9 bucks a bottle!!! YIKES! No thanks. I purchased my polishes in an EBAY (oh how i love you Ebay) Sally Hanson auction lot that came with various series i.e Extreme Wear, Complete Salon Manicure,(check out my Simply Divine post for swatch on that) Insta dry, Sugar Coat and these GEM CRUSH babies you see below.  


 WHICH ONE IS YOUR ABSOLUTE MUST TRY?
Oh look at all these sparkles!!! Do they make you as happy as they do me? I love em all in their own unique way. 

Word of Advice:
These polishes are pretty awesome glitters in a clear polish base and are very opaque after just 2 coats.
The nail swatch pictures above are the polishes themselves, 2 coats, no base color, and as you see they are the perfect glitters to wear alone. No need to pair them up with anything, except maybe a nice handbag and a night on the town.

Hope you enjoy.As always,

         Have a Grand day and don't forget to GlaZe!

Monday, December 16, 2013

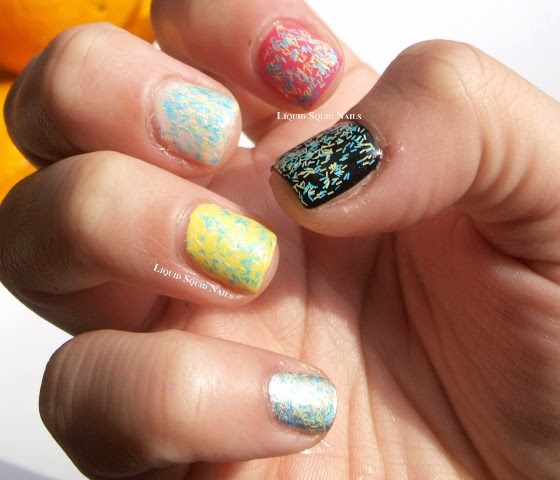
Day 25: Sally Hansen Fuzzy Coat Nail Polish

Hi Again ALL peoples! I need your help in deciding whether this polish is nail swatch worthy.It Is called: Sally Hansen Fuzzy Coat nail polish in: Fuzz Sea.

 I applied the Fuzzy Coat nail polish over different bases: silver,yellow, cream,pink and black.


I'm unsure of this polish and don't get a "fuzzy coat" sense about it all. Textured polishes have a texture, and glitter polishes, glisten and glow in the dark polishes glow, but how can a fuzzy coat polish feel like a fuzzy coat?... I don't know what I was expecting from this polish and I need someone else opinion about it.

Can you PLEASE, PLEASE voice your thoughts, experiences and opinions about the Sally Hansen Fuzzy Coat polish brand?

Have a Grand day and don't forget to GLaZe!

Sunday, December 15, 2013

Day 24: Sally Hanson Complete Salon Manicure - nail polish review in "Simply Divine"


Hi again everyone! Hope you're enjoying you lives, taking time to appreciate the little things and glazing away!! Today I wanted to share with you My new found favorite polish brand: Sally Hanson Complete Manicure .

Pros of Polish:
1. thicker consistency (many polishes only need 1 coat to be completely opaque)
2. Salon professional thicker nail brush (this i wonderful on so many levels, including better polish application
3. Larger bottles (at 05. oz its bigger than m,any polishes that can be as small as 0.15 oz)
4. GREAT PRICE (for the quality, it cant be beat)
5. Very pretty flesh tones shades, creams and some pinks that have made me reconsider the beauty of pinks
6. FEELS AMAZING on your nails, with a silky shine and amazingly smooth finish

Cons:
1. Very thick (yet some polishes can still streak)
2. Longer drying time
3. Partly shrinks (when topped with Seche Vite top coat)
4. Not very hip (not too many glitters or "blam wow" colors. kinda average color ranges)


Below you will see the color I chose to swatch: Sally Hanson complete Manicure in: "Simply Divine"

Pinkish tones

More accurate color representation

Isn't it divine?!!?

Nail farthest to left = more pink tones. Nail farthest to right = coral pink tones.

So as you see, the various swatches show the different colors that this wonderful nail polish has, depending on the lighting. I love looking at the polish when in better sunlight, because the coral pink tones are just stunning.Hope you enjoy this nail swatch. 

Let me know what you think please. 

Have a Grand day and don't forget to GlaZe!