Showing posts with label nail art. Show all posts

Sunday, August 3, 2014

Day 59: Born Pretty manicures and nail designs

Posting some pics of nail designs and simple nail art that I embellished using born pretty store embellishments. I am very pleased with how they turned out. Watcha think? 
 Flower decals can be purchased HERE
 Arent these so pretty?!!! IM IN LOVE with them, if i do say so myself. :)
Hexagon studs can be purchased HERE 

SAVE 10% OFF ENTIRE PURCHASE. Use code: YESX31

Until next time,"Have a grand day and dont forget to Glaze!"


Wednesday, May 21, 2014

Day 50: Sally Hansen Nail art Contest - staycation - sally hansen nail polish

Today's post is about a contest ive entered in. It is the Sally Hansen Vacation nails contest. If you would like more info on how to join click HERE. After having joined preen.me and won several contests, I was offered FREE products from Sally Hansen. How cool is that?!! Then, preen.me contacted me last month to tell me about Sally Hansen's latest nail contest. Prizes are any where from $500 - $2000 and a trip to NYC to meet the Sally Hansen people. So you know, im trying a win this thing right? :)

Here is my representation of a vacation, a luxurious stay in Dubai, where luxury, comfort and price are NOT AN ISSUE!!! :)


So what do you all think? Do i have a chance of winning? 
Enter NOW for your chance to win great prizes too!!

Until next time,
"Have a grand day and dont forget to Glaze!"

Saturday, April 12, 2014

Day 46: Nail swatches from a fellow nail polish lover

Hello lovelies!!!! I know i have been MIA for sometime, mostly from business and partly because i wasn't sure i should even bother with my blog since i have gained so few followers. That all changed today because of a sincere and sweet soul that i have as an instagram friend. Her Instagram tag is @nailpolishaddict11 or URL http://instagram.com/nailpolishaddict11. She reminded me today that i started this blog, not to compete with the bigwigs of the nail polish community, but to work with them in being another voice to the vastly growing community of nail polish lovers. It is because of some these nail polish goddesses that i developed such a love and respect for nail polish and its many facets.

@nailpolishaddict11, also called Jenn Morgan, helped to put into perspective why i started this nail blog in the first place: to share my journey on all things polish in hopes of touching even one person. She is that one and i am so grateful to her. Please consider checking out her IG and following her. She is a sweet person, a fellow nail polish lover and someone who is just worth knowing. *Muah* to you my dear Jenn Morgan.

In HONOR OF @nailpolishaddict11, i am posting some of her gorgeous swatches and manis below.

Enjoy! 

 look at the length of those nails!!! *Gush* love them, the polish color and her square tips which I desperately try to do to my own.....Ceramics tends to ruin my efforts more often than not. :/
 These glitters are fabulous!!! What a wonderful glitter topper this is. 
 Loving the stripe work she has going on here. Very symmetrical and even spaced lines. I heart her nail art and skills. You should definitely follow her on instagram *hint hint* :)
Who doesn't love a vibrant pink and some lovely dots??? 

This blog post is for you Jenn, as a sincere thank you for reminding me that I blog for the sake of sharing my journey not only to grow in numbers.


As always my darlings,
"have a grand day and dont forget to Glaze!"


'

Thursday, February 6, 2014

Day 42: A cosmetic haul from the Dollar Tree

Hello everyone! 
Today's post features a mini haul from my travels to the Dollar tree this past week. As you who read my blog know by now, i absolutely ADORE DOLLAR TREE and find some great hidden gems or name brand items for ONLY A BUCK! Who can beat that? 


Tuesday, January 7, 2014

Day 33: Nail Art using China Glaze, Rimmel London and more! Alexis Posh

Hi all!!! Today i want to share you with you this lovely manicure, inspired by the recent giveaway I WON (so rare for me) from the China Glaze 2013 Collection. Besides the Gorgeous China Glaze polish, i was also itching to try the geometric stain glass kinda look I saw others use with nail striping stickers.

And thus, Alexis Posh was created. FYI I have this weird thing where I have to NAME my nail art. Not other peoples nail art because if I was 100% recreating something from another nail artist, I would definitely give credit. But nail art that is mine, that i created using techniques and my color inspirations and random doodles, i name.... I wonder what that says about me? Hmm. Anyhoo, the pictures are below.

ENJOY

 The China Glaze 2013 Christmas Collection that i WON! :) 


 Really happy with my first attempt at the Nail striping sticker technique!


So that is the Mani I have to share with you today. Hope you enjoy it. Please leave comment,thoughts, questions, below.

As always,

"Have a Grand day and dont forget to GlaZe!"


Monday, December 23, 2013

Day 28: Maybelline Color Show Sequins Nail polish

HEllo everyone! If you are new to my blog, WELCOME. For all the regulars, today is a post on glitter polishes. I wanted to share with you the great deal I found at Big Lots. The Maybelline Color Show Sequin polishes were only $1 EACH! How could I pass up this amazing deal right?!? That was how I reasoned myself to buy them. Truth be told, i have 2 polish racks that fit 90-100 polishes each and both are COMPLETELY FULL! I told myself, "Melanie once both polish racks are full, NO MORE polishes for you." Well dear readers, I have dishonored my declaration, because I now have more polishes than I do rack space... :/ My next step is to sell those polishes that I am not too fond of so ALL my polishes can fit on both racks. 

From the beginning of this polish journey, to now, I told myself ORGANIZATION is key to maintaining this nail polish relationship. I have 2 polish racks, a drawer that hold my nail supplies, and a desk that i can work on while painting my nails. I am going to stick to this layout. The last thing I want, or MY HUSBAND wants, is polishes everywhere all over the house. UGH! No way. Love blogging because I can share these random blabberings with you all and you actually "listen" to me. GuSH :) Thank you for reading this. I shall get off my soapbox now. 

Below is a picture of 3 glitzy polishes by the Maybelline Color Show collection.
If you would like some swatches, be sure to comment and I shall honor your request.


Have a Grand day and dont forget to GlaZe!

Saturday, December 21, 2013

Day 27: Frosted Snow Globe Nail Design - Nail art

Hi all!!! Hope you are enjoying the wonderfully cold weather and playing in the snow, snow, snow!!! It doesn't matter your age, snow is just fun and to play in it feeds the inner child. I have yet to master the art of a perfect snow man but a girls gotta try. NEVER GIVE UP is my motto so how could I abandon the adventures of finding the right snow, the best sticks, and going to town on making a snowman worth photographing. Well dear reader, I have yet to master the perfect snow man outside, but i believe i managed to come close in this winter inspired manicure.

Let me know what you think please!!!! 


Want to know what polishes I used? Want a pictorial? Drop me some comments below please and I shall honor your request.


As always,
Have a Grand day and don't forget to GlaZe!

Monday, December 16, 2013

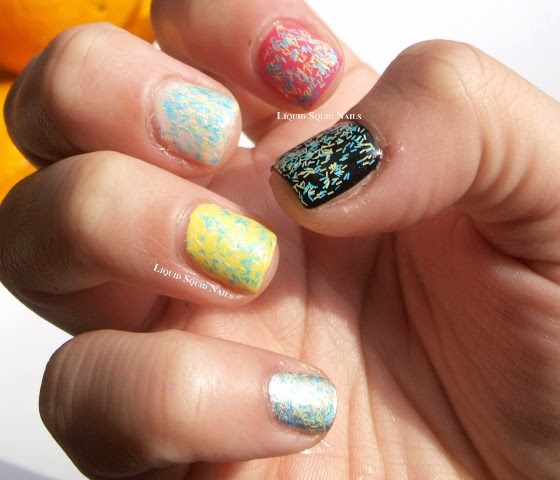
Day 25: Sally Hansen Fuzzy Coat Nail Polish

Hi Again ALL peoples! I need your help in deciding whether this polish is nail swatch worthy.It Is called: Sally Hansen Fuzzy Coat nail polish in: Fuzz Sea.

 I applied the Fuzzy Coat nail polish over different bases: silver,yellow, cream,pink and black.


I'm unsure of this polish and don't get a "fuzzy coat" sense about it all. Textured polishes have a texture, and glitter polishes, glisten and glow in the dark polishes glow, but how can a fuzzy coat polish feel like a fuzzy coat?... I don't know what I was expecting from this polish and I need someone else opinion about it.

Can you PLEASE, PLEASE voice your thoughts, experiences and opinions about the Sally Hansen Fuzzy Coat polish brand?

Have a Grand day and don't forget to GLaZe!

Friday, December 13, 2013

Day 21: Nail Art - Paint Chips - Design

Hi everyone! I started out with a black polish base knowing i wanted to add the wonderful pink coral polish by Sally Hansen complete manicure in "Simply Divine". After some polishing,removing,tweaking and improving, I came up with the nail design you see below. I call it: paint chips.
Hope you like :)


"Have a grand day and don't forget to GlaZe!"

Monday, December 9, 2013

Day 18: Sally Hansen Sugar Coat Nail Polish


The less shiny ones have matte top coat. 
The white and purple nails have regular gloss top coat.
 Hi Everybody!! I would like to share with you some polishes I received last week. I was bidding on Ebay (see a pattern? Love that place :)) for a lot of 50 polishes and I won!! Among the many wonderful Sally Hansen nail polishes i received, there were 5 of particular interest. These 5 babies are the ones you see in the pictures below. The Sally Hansen Sugar Coat polishes are really different in texture and quality.

PROS:
-Texture- gritty, like sugar grains on the nails
-Pretty, fun colors
-Opaque in 2 coats
-Dries to a slight matte
-Keeps its gritty look when used with Matte Top Coat

CONS:
-Takes awhile to dry
-Will chip faster (because of texture of course)
-Would like darker colors
-Texture is diminished with top coat (especially if using regular gloss top coat)


 Colors from left to right (white to purple)
1. Sugar Fix 200
2. Cherry Drop 300
3. Sweetie 400
4. Razzle-berry 500
5. Bubble plum 100


Colors used to make sprinkle effect. Below
sprinkle effect. :)

like rainbow colors sprinkles on a cone. :)


Have a grand day and don't forget to GlaZe!


So what do you think? Like the colors? Texture? Any comments and replies would be wonderful!

Sunday, December 8, 2013

Day 17: Nail art design - Cupcake tutorial - step by step

Hi everyone!! I was inspired by using blue because, lets face it, blue looks wonderful on nails. :) So I started out with blue and then started dotting with hot pink and i couldn't figure out what to do. My initial design was just to make curves with dots but then as i kept looking at the hot pink, realized this in the the shape of a cupcake!!! So my design became a cupcake. Here is the step by step Tutorial on how i made the cupcake design on a blue nail base. Enjoy!


Technique:
1. Base with blue
2. Using Dotting tool made 4 dots then used polish and drug down = cupcake outline
3. Apply 4 white dots, then combine them making a fluffy white cloud like shape (see step 4)
4. Using toothpick, made yellow and black lines going vertical
5. Add "sprinkles' using tiny dotting tool or toothpick. (use whatever colors you own. Experiment and have fun :))
6. Add sparkly polish over all of the nail except the cupcake part
7. and VOILA! You can have your cupcake and see it too :) :) 

This is my first step by step with pictures design. I hope you enjoy :) Please comment, reply, let me know you've stopped by my blog. If you recreate this, post and share. Would love to see variations on this yummy cupcake design.


Have a Grand day and don't forget to GlaZE!


Cupcake Sparkle